Eva fountain - editing plan
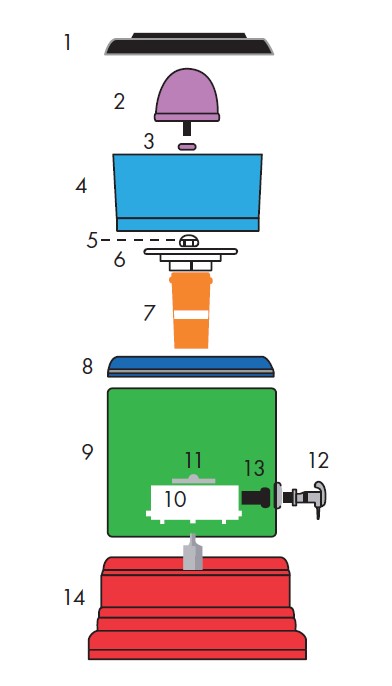
Assembly diagram
1 - cover
2 - High density ceramic filter
3 - Ceramics joint
4 - Superior tank
5 - Ceramics nut
6 - Cup of the filter cartridge fixing
7 - filter cartridge
8 - Large cup
9 - Lower tank receiving filtered water
10 - Blue mineral basket
11 - Green IRL piece (for fountains with BEP magnetic system)
12 - Faucet
13 - Faucet nut
14 - Base
Remove the protections from your EVA fountain then rinse all the elements with clear water.
Put there ceramic In the bin pierced with a central orifice (n ° 4), the inner seal (n ° 3) of the ceramic must be positioned inside the tank (n ° 4). Screw the butterfly (n ° 5) of ceramics, without forcing, finally rinsing under the clear water of the tap.
Take the filter cartridge (n ° 7) and follow the user manual (page 21).
Remove your packaging, then plunge it into a container filled with water to evacuate the air bubbles (2 to 3 minutes).
During this operation, prepare the base (n ° 14) on which you will have the second tank (n ° 9) for receipt of filtered water.
Proceed to Vitting of the tap (n ° 12), introduce it into the planned orifice. There are 2 seals for sealing: 1 inner seal + 1 outdoor seal, position them correctly in order to obtain the desired seal. The flat parts of the joints must be positioned along the tank.
Take the nut (curved side to screw against the seal), screw without forcing and especially without crushing the joints.
Take the basket blue (n ° 10) filled with minerals and rinse it with tap water to remove excess mineral dust and place it in the center of the second tank (n ° 9).
For BEP models, The magnetic disc White is already installed in the blue basket (n ° 10), you just have to add to the center of the lid of the basket the Green Piece IRL (n ° 11).
Place the large cup (n ° 8) on the second tank (n ° 9)
Put the cartridge (n ° 7) under tap water to finish serving it, black water can flow due to charcoal, as soon as the water is clear, your cartridge is ready to use.
Screw it filter cartridge (n ° 7) on the small cup (n ° 6) (fixing cup) and introduce it into its location.
Then place the tank with the ceramic (n ° 4+n ° 2+n ° 3+n ° 5) on the large cup (n ° 8) and place the cover (n ° 1) on the top of the fountain
Your fountain is ready.
Put water in the upper tank (n ° 4) and let it filter.
After assembly, you must perform 4 filtration cycles before consuming the water: fill your upper tank a 1st time, let the water passed into the lower tank and give thefiltered water to your plants. Repeat this operation three times.
Emptying all of the water in the lower bin (tank where there is the tap) at the end of each cycle after these filtrations, your Eva fountain is ready ...